 When the beginning filmmaker takes to the set, he or she may not be aware of the powerful capabilities of a quality camera. What begins as an exciting adventure can soon turn into frustration because without the full understanding of the camera’s basic components, the appearance of the finished product just never lives up to expectation. By enlarging your knowledge of the functionality of your camera you can not only generate a better quality result, but you’ll develop the ability to add artistic nuance to your film.
The object of this article is to teach you about the components of the camera and how to configure them properly to get a quality image.
Basic Camera Components
The Lens
 The lens is the eye of the camera. Light enters the lens, then travels through several individual glass components (each called an element) where it is refracted and redirected until ultimately it is projected onto the film or image sensor inside the camera to produce an image. Some of the elements in the lens can be adjusted to control things such as focus and zoom.
Lenses provide three very important features: Focus, Aperture, and Zoom.
Focus
When light reaches the camera lens, the rays get scattered and incoherent. Without a lens, there would be no image, just a haze of light. The elements inside the lens help to redirect these light rays to a point where they reassemble the image on the film or image sensor. By adjusting the position of the elements, we can control what appears sharp and crisp and what is blurry. This is done by adjusting the focus ring.
The focus ring has settings from near to far, allowing us to focus on subjects close to, or far away from the camera. Markings on the focus ring (if your lens is so equipped) show the focal distance. This is the distance from the front of the lens to the object that is in focus. Rotating the focus ring to the near settings bring objects near the lens into focus while larger distances put farther objects in focus. Most lenses have an infinity setting. This means that you are focusing at the farthest distance the lens will allow. This is great for distant mountains or far away buildings. Be aware that many lenses can go beyond the infinity setting a small amount and put everything out of focus… very undesirable.
While most lenses let you focus out to infinity, many lenses have a difficult time focusing extremely close. Special lenses that allow for extremely close shots are Macro lenses and often cannot focus beyond a few feet. They do, however, providing the ability to do extreme close-ups.
Zoom
Zoom controls the focal length of the lens. The focal length refers to the distance between the lens and the point and where the image is focused (hopefully on the image sensor). Zooming in, also called Telephoto, increases the focal length. This makes the subject appear larger. Zooming out, or Wide Angle, decreases the focal length, resulting in the subject appearing farther away.
By moving the lens elements inside the main lens body, the light from a smaller area in front of the camera can be expanded across the image sensor which makes the subject look bigger and closer. Conversely, the elements can be arranged to allow a wider view to be projected on the sensor which makes the subject appear farther away.
Focal length is a number that is calculated based on the distance of the lens from the film or image sensor. But it is also affected by the size of the sensor. A larger sensor would capture more image and thus result in a smaller subject, while a smaller sensor would capture less of the image coming through the lens resulting in a larger subject. Therefore, focal length is less a measurement of the physical properties of the lens and more the appearance of the resulting image.
Lenses are measured based on their focal length. Normal focal length is 40mm. This captures an image comparable to that of the human eye. Telephoto lenses are larger, 75mm for example, and make your subject look bigger. Wide angle lenses capture a wider area, making your subject look smaller and farther away. These lenses come in less than 40mm in size, i.e. 28mm. A lens with zoom control is labeled with its minimum and maximum focal lengths: 28mm-75mm, for example.
Some lenses don’t offer zoom control. These are called Prime Lenses because their focal length is permanent and offers no other setting. These types of lenses are desirable because they offer a wider aperture limit than a lens equipped with zoom. Additionally, zoom lenses often limit the aperture size and even change the aperture size over the range of the zoom.
The Aperture
The aperture is a device inside the lens of the camera that controls the amount of light passing through toward the film or image sensor. The aperture (also called the iris) can be enlarged or reduced just like the pupil of a human eye, which performs the exact same function.
When there is too much light, our eyes close the iris to limit the amount that comes in. In darker environments, the iris opens to allow as much light as possible so you can see. The aperture works the same way.
If too much light enters the camera, the resulting images are overexposed (also called “blown out”), with definition in the bright areas completely lost. In the other extreme, if too little light makes it to the sensor, the image will be dark with definition in the darker areas unrecoverable as well. When the proper amount of light is allowed to enter, the image is rich and adequately detailed.
While there is a little latitude during the post production process, it is extremely beneficial to make sure you have proper exposure when you shoot.
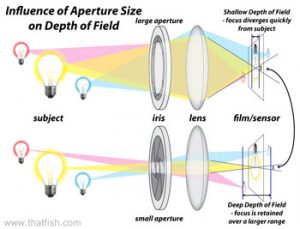
An iris’ settings are referred to in f-stops. This is a system used to measure light and how much of that light actually passes through the lens. F-stops use an inverse value system to determine the amount of light the iris will allow. Smaller f-stops allow more light, higher f-stops allow less. The diagram demonstrates the aperture sizes for various common f-stops.
While some experienced camera operators can estimate light levels simply by looking, most of us are not that knowledgeable. Thankfully, there are several tools to help determine the proper f-stop setting for your shot. Light meters have been popular for decades. More typically, with modern cameras, you can get very good settings by using the automated features on the camera to get a starting point. (Remember, NEVER use anything automatic on a camera for your actual shot… it’s not professional… well, at least don’t use it in front of professionals 🙂
Remember, in dark conditions, open up the aperture. In bright conditions close it up. But…
Closing the iris has a downside. A smaller aperture limits the paths of the light rays entering the camera. This expands the amount of your scene that is in focus. The space in your scene that is in focus is called Depth-Of-Field. The diagram demonstrates this. (click on the image for a high-res version)
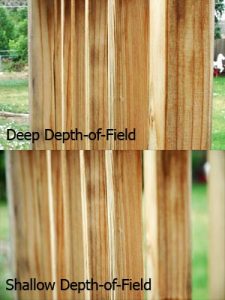
A deep depth-of-field means that a large range of space inside your shot is in focus. A shallow depth-of-field results in a very narrow band of your image being in focus. In these photos you’ll see the difference between a low f-stop exposure (wide aperture) and one of a high f-stop setting. The rocking horse in the back ground shows the big difference in blurring as both shots were focused on the same wood railing post.
 Having a deep depth of field greatly reduces the visual appeal of the resulting image. This is a common issue with shooting video with a video camera as their smaller chip size and limited iris settings prevent achieving a shallow depth-of-field.
If all you have is a video camera with a lens that is not removable, you may want to look into depth-of-field adapters. They allow you to add a separate lens to your camera, which increases the focal length and gives you the freedom you need to control your focus.
On film and DSLR cameras, keeping the aperture wider is desirable in most situations. However, this means that you lose one of your methods of controlling the amount of light coming into your lens. If, after you’ve opened the iris, you have too much light there is another option available to help you: ND filters.
Neutral Density Filters
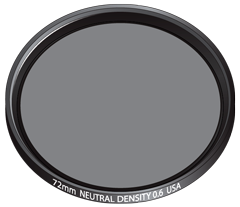 A neutral density filter (also called a ND filter) is an attachment for the lens that reduces the amount of light that may enter. Its purpose is to block some of the light entering the camera so the iris can remain as open as possible and retain that desired depth-of-field.
ND filters come in various tints to allow the camera operator the ability to mix and match to find the proper filtration for the shot. While uncommon, more than one filter can be put on the camera to provide the right setting.
Because ND filters are not typically used for basic photography you will likely have to purchase a set on your own. Some higher end lenses may have their own built-in ND filters.
ISO/Gain
ISO and Gain determines the sensitivity of the film or image sensor in the camera. Higher ISO settings are more sensitive to light while lower settings absorb less light to produce a similar image.
Gain and ISO are identical in their function. Gain is used on video cameras, while ISO is typically used for film cameras. This line has become somewhat blurred in recent years as DSLR cameras are still using ISO settings though they record on CMOS sensors instead of film.
For digital cameras this setting is an amplifier for the signal coming from the sensor. The higher the ISO number, the higher the amplification. Unfortunately, the amplification process also increases the noise that is always present in the chip. The more you amplify the signal, the more you amplify the noise. This increased noise results in graininess. It is best to use the lowest ISO/Gain setting on your camera if possible to avoid the noise.
It is important to know that some cameras have “sweet spot” ISO settings. This means that some ISO values are native to the camera and provide less noise than others. Research your camera to see what settings will work best for you.
Shutter Speed
The shutter is the device in the camera that opens and closes to allow light to strike the film or image sensor. While its function is varies somewhat between film and video cameras, it performs the same function: to determine the amount of time recorded onto a single frame.
Still photography shutter speeds can vary from extremely short, sometimes in the range 0f 1/10,000 of a second, to several hours in length. This provides for some unique opportunities for interesting photography. However, these settings are not only unreasonable for motion pictures, some are quite impossible.
When shooting video or film, the camera can record no more than the inverse of the number of frames per second. For example, if you’re shooting at 24 frames per second, you cannot have a shutter speed longer than 1/24 of a second because the camera needs to start capturing light for the next frame. Typically, the shutter is open for somewhat less than this amount of time, often half of this amount.
Shutter speed determines how much of a slice of time will be recorded on a single frame. The longer the slice, the more motion is captured. By reducing the shutter speed, you capture less motion. Too much motion leaves your video looking blurred and smeared. Too little, and everything is frozen in each frame, which appears choppy. Video cameras (because of the NTSC standard of 60 interlaced frames per second) tends to use 1/60th of a second for shutter speed and ends up looking like video. Film is shot at 24 fps, and typically is shooting around 1/48th of a second. Try to use settings in this range if possible.
Zoom and the Third Dimension
While it is a big no-no to use the zoom during a shot (there are always exceptions to the rules), using the zoom to adjust the camera prior to a shot is a great way to change several key features of your final image.
The zoom (if your lens is so equipped) changes the focal length of the lens. This does several things. As you know, it makes everything in the image look bigger.
When everything in the image gets bigger, the difference in relative sizes of the object in the scene become somewhat normalized. This causes things to look as if they are closer together. This can be a negative because we are trying to create a three dimensional image, not squash it flat. One solution is to separate objects even farther than they were before.
There is, however, a powerful reason for wanting to increase the zoom. This wonderful side effect is the reduced depth-of-field which gives that great film look that everyone loves. Less of the shot is in focus, which helps to visually define the objects in different planes of the image. We can direct the eyes to the part of the image that is in focus and keep the eyes there. With a deep depth-of-field, nearly everything is in focus and the eye can wander around looking for what else they can see. This takes the focus off the character, something we don’t want.
White Balance
Light isn’t always the white our eyes want to see. The human eye is a masterpiece of design, and it has the uncanny ability to distort light so we typically see it as white. Sun light is blue, tungsten lighting is orange, and fluorescent light is green.
Most video cameras offer an auto white balance setting. The camera samples the light around it and it makes an estimation of the tint of the light’s color and adjusts the camera accordingly. While this takes the burden off of the camera operator, it not only limits the camera operator, but it adjusts itself continuously and may result in unwanted changes mid-shot.
White balance is critical to achieving a quality result. While you can use color grading (intentionally changing the colors in your movie to portray a theme or motif), shots that vary in their color in the same scene can be very distracting and appear unprofessional. It’s best to get good white balance during production and then do your coloring after.
Most cameras have various white balance controls. Some are presets that allow you to choose a standard lighting condition, such as outdoors, indoors, shade, etc. Many cameras offer you the opportunity to set your own white balance based on the conditions you are working with. This is the best option as it adjusts your camera to reproduce colors accurately.
Quality cameras will have a custom white balance option that allows you to demonstrate white to the camera so it can adjust appropriately. This is done by holding a white card in front of the subject and allowing the camera to reference the color coming from the card and adjusting itself to produce the proper balance. It is important to do this every time your camera position changes or if you move your lights. If you are using colored gels on your lights, you may want to remove them temporarily while setting your custom white balance as the camera will then properly expose for the gels giving you the color you want.
Improving the Camera
Whether you’re using a film camera, DSLR, or video camera, there are some additional steps you may want to take to get that much more quality out of your shoot. Many cameras provide the basics to get an image on film. But by combining the following tools you can boost the quality of your production.
Matte Box
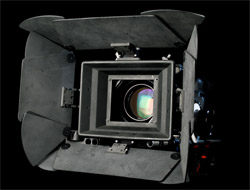 A matte box is an attachment for the camera that limits stray light from entering the lens. Light entering from bright light sources creates lens flares (artifacts of light reflecting and refracting inside the glass of the lenses). When unwanted light is eliminated from the shot, the image is clearer and richer.
Barn doors on the matte box allow the operator to isolate nearby lights and prevent their light from entering the camera.
Matte boxes range in price from the homemade do-it-yourself kits to several thousand dollars. Regardless of how you do it, they come in very handy and your end result will reflect it. A powerful tool in your camera arsenal.
Stabilizers
One telltale sign of a low budget film is the shaky camera work. Theatrical movies typically have big camera moves that are smooth and steady. The primary reason for this difference is the weight of the camera rig.
The quickest way to smooth out your footage is to add weight to your camera. Be it as simple as mounting it to a tripod and using it as a handle, acquiring a shoulder mount setup, or spending the big bucks for a steadicam system, the camera will move more smoothly because little bumps simply can’t accelerate the camera like they did before.
Expensive systems are great if you can afford them, but most Christian filmmakers are going to be a bit more frugal and build something that works for them.
Follow Focus
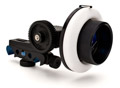 Most cameras of any quality allow you to adjust the focus as you shoot. Unfortunately, however, you will find that it is extremely difficult to adjust the focus while you are looking at the image on the display, or holding the camera up in the air.
This is where follow focus comes in. This is a device that mounts to the camera and allows you to adjust the focus with ease.